 switch1.jal
Build the circuit and program the 16x84.
This assignment starts very simple: a push on a button instructs the 16x84 to light a LED for 5 seconds.
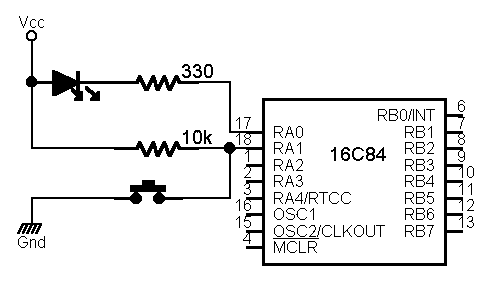
The circuit is very simple: a LED, a switch and two resistors. And of course the parts from the basic hardware, which are not shown here.
   include 16c84_10
   include jlib
   pin_a0_direction = output
   pin_a1_direction = input
   forever loop
      pin_a0 = high
      if pin_a1 == low then
         pin_a0 = low
         delay_1S( 5 )
      end if
   end loop
The first line identifies the kind of 16x84 and the clock frequency. The second line includes the standard library.
Next the two pins which are used are put in the correct direction (input or output).
The main part of the program is an eternal loop. The loop start by switching the LED off. The LED is connected between pin A0 and the +5 Vcc, so we must make pin A0 high.
Next we check whether the switch is pressed. When that is not the case (input A1 will be high) the lines between then and end if are not executed. The loop is finished and starts again.
When the sitch is pressed (input A1 is low) we turn on the light (pin B0 low) and we delay for 5 seconds. After that the loop is finished and we start again. At the begin of the loop the LED is switched off again.
switch1.jal
Build the circuit and program the 16x84.
Now we will use the same circuit for a different purpose: one push of the button must switch the LED on, the next push must switch it back off etc.
   ...
   var bit led = high
   forever loop
      pin_a0 = led
      if pin_a1 == low then
         led = ! led
      end if
   end loop
The line led = ! led inverts the value of led: high becomes low and low becomes high.
switch2.jal
Modify the program and try it.
The effect is that while the button is pushed the LED lights
with half intensity. When the button is released the
LED is randomly on or off.
Try to reason why the program behaves this way.
The program was constantly toggeling between on and off while the button was pressed. To prevent this we should toggle the value only when the button is released again. This can simply be achieved by inserting a line
while pin_a1 == low loop end loop
switch3.jal
Put the line in your program and try it.
The effect is somewhat better now: no half-burning any more while the button is pressed. But still the pressing of the button does not always toggle between on and off. This is caused by contact bounce: when the button is pushed the contacts close, open again, close etc. in a rapid succession, before they finally close. This bouncing takes a small time, 50 ms seems to be a safe upper limit. So we must adapt the program so that after the first closure we wait 50 ms before we check again so see whether the button has been released again. Adapt the program by putting a delay
delay_1mS( 50 )
switch4.jal
Change your program and try it.
Now that we known how to detect a single button press we go back to our original goal: the timer. The next step is to make it possible to configure the time that the LED is on.
Our timer should work like this:
The various parts of the program will be explained in the order in which they are executed by the program. In your program file the order must be reversed, because a declaration must always precede the use of the declared object.
   forever loop
      pin_a0 = high
      if pin_a1 == low then
         pressed
      end if
   end loop
In the eternal loop we first switch the LED off. When the button is pressed we call the procedure pressed which handles all details.
   procedure pressed is
      pin_a0 = low
      var byte count = 1
      delay_100ms( 1 )
      while pin_a1 == low loop
         delay_100ms( 1 )
         count = count + 1
         if count == 50 then
            configure
            blink
            return
         end if
      end loop
      delay_1s( seconds )
   end procedure
In the procedure pressed we first switch the LED on and we declare a byte variable in which we will count how long the button is pressed. We count this time in units of 100 ms. Next we wait the first 100 ms to make sure that the swicth bouncing is over. Next we enter a loop in which we will remain as long as the button is pressed down. When the button is released soon the loop ends, we wait the configured amount of seconds (with the LED still on) and we return to the main loop which will turn the LED off.
Within the loop we wait 100 ms and increment the time counter. When the counter reaches 50 (5 seconds) we call the procedures configure and blink and then we return immediately to the main loop, without the waiting.
   procedure configure is
      seconds = 0
      var byte idle = 0
      while idle < 20 loop
         if pin_a1 != low then
            delay_100ms( 1 )
            idle = idle + 1
         else
            idle = 0
            delay_100ms( 2 )
            seconds = seconds + 1
            while pin_a1 == low loop end loop
         end if
      end loop
   end procedure
In the configure procedure we count the number of times the button is pressed, because this is the number of seconds that the LED must be on. We must also count how long the button is not pressed (idle), because two seconds indicates that the user has finished. When the button has not been pressed for 2 seconds (idle == 20) we leave our procedure.
As long as the user keeps pressing the button in rapid succession we remain in the while loop. When the button is not pressed we wait 100 ms and increase the idle time. When the button is pressed we clear the idle counter, increase the configured number of seconds, wait (for the swith bouncing) and wait until the switch is released again.
   var byte seconds = 10
   procedure blink is
      for seconds loop
         pin_a0 = high
         delay_100ms( 5 )
         pin_a0 = low
         delay_100ms( 5 )
         pin_a0 = high
      end loop
   end procedure
Finally the procedure blink just loops for the configured number of times. Within the loop the LED is turned on, we wait a little, turn the LED off, and again wait a little.
switch5.jal
Enter the new program and try it out.
Test whether the on time of the LED can indeed
be configured at for instance 2 and 10 seconds.
A disadvantage is that the configured time will be lost when the power is removed (try this).
The 16x84 contains a data eeprom which we can use to store a small amount of data (atually 64 bytes - quite large compared to the RAM of a 16x84!). The eeprom can be accessed using the procedure eeprom_put and the function eeprom_get. These calls look like this:
   eeprom_put( 0, ... )   -- save the value ... at eeprom address 0
   ... = eeprom_get( 0 )  -- get the value from eeprom address 0
switch6.jal
Adapt your program to retrieve the timeout
from eeprom at startup and to store it
in the eeprom when it is modified.
Use eeprom address 0.
Now we will use the same circuit again but for a very different purpose: a code slot. The LED must only be turned on when the button is pressed in a particular rythm. We use an 8 bit code, each bit in the code stands for either a long or a short push on the button.
First we must decide how along a "short push" actually is. The next program will only turn the LED on when the button is pressed shorter than 50 ms.
   forever loop
      pin_a0 = high
      if pin_a1 == low then
         delay_1mS( 50 )
         if pin_a1 == high then
            pin_a0 = low
            delay_1S( 1 )
         else
            while pin_a1 == low loop end loop
         end if
      end if
   end loop
switch7.jal
Try the program and modify the delay time until
you can reliably activate the LED.
A good code lock is not easy to open by trying out all combinations. This can be achieved by allowing a very large number of codes, but that makes the actual code long and thereby hard to remember. Another way is to make sure that after a code has been tried and found invalid the user must wait some time before a next code can be tried. For the rightfull user this is only a small nuisance.
Another thing to pay attention to is that the program must understand when the entering of the code starts, otherwise it will be virtually impossible to open the lock after a few button presses. Our program assumes that a new code will be started when the button has not been pressed for a few seconds.
   var byte code
   forever loop
      pin_a0 = high
      if pin_a1 == low then
         read_code( code )
         if code == 0b_0000_1111 then
            pin_a0 = low
            delay_1s( 5 )
         else
            delay_1s( 10 )
         end if
      end if
   end loop
The main loop is simple. Fisrt we switch the LED off. When the button is pressed we call the procedure read_code which returns with the code that was read. We compare the result to the secret code and when it matches we turn the LED on for 5 seconds. When there is no match we wait 10 seconds before we try to read a new code. The secret code shown here is 0b_0000_1111, which means four times short and then four times long.
      procedure read_code( byte out x ) is
      for 8 loop

         var byte n = 0
         while pin_a1 == high loop
            delay_1mS( 5 )
            n = n + 1
            if n == 255 then
               x = 0
               return
            end if
         end loop

         delay_1ms( 200 )
         x = x << 1
         if pin_a1 == low then
            x = x + 1
         end if

         while pin_a1 == low loop
         end loop

      end loop
   end procedure
The read_code procedure consists of a big for loop which is meant to be executed 8 times. In this loop we first wait for the button to be pressed. When this takes too long we resturn with the code 0 (= 0b_0000_0000), which makes this code a bad choice for your secret code!
The second part is executed when the key is pressed. We first wait 200 ms. When the key is now still pressed we shift a 1 into x at the right, otherwise we shift in a 0.
In the last part we wait untill the button is released again, otherwise the loop would immediately assume that the button was pressed again.
switch8.jal
Enter the code lock program and test it.